 Pin It
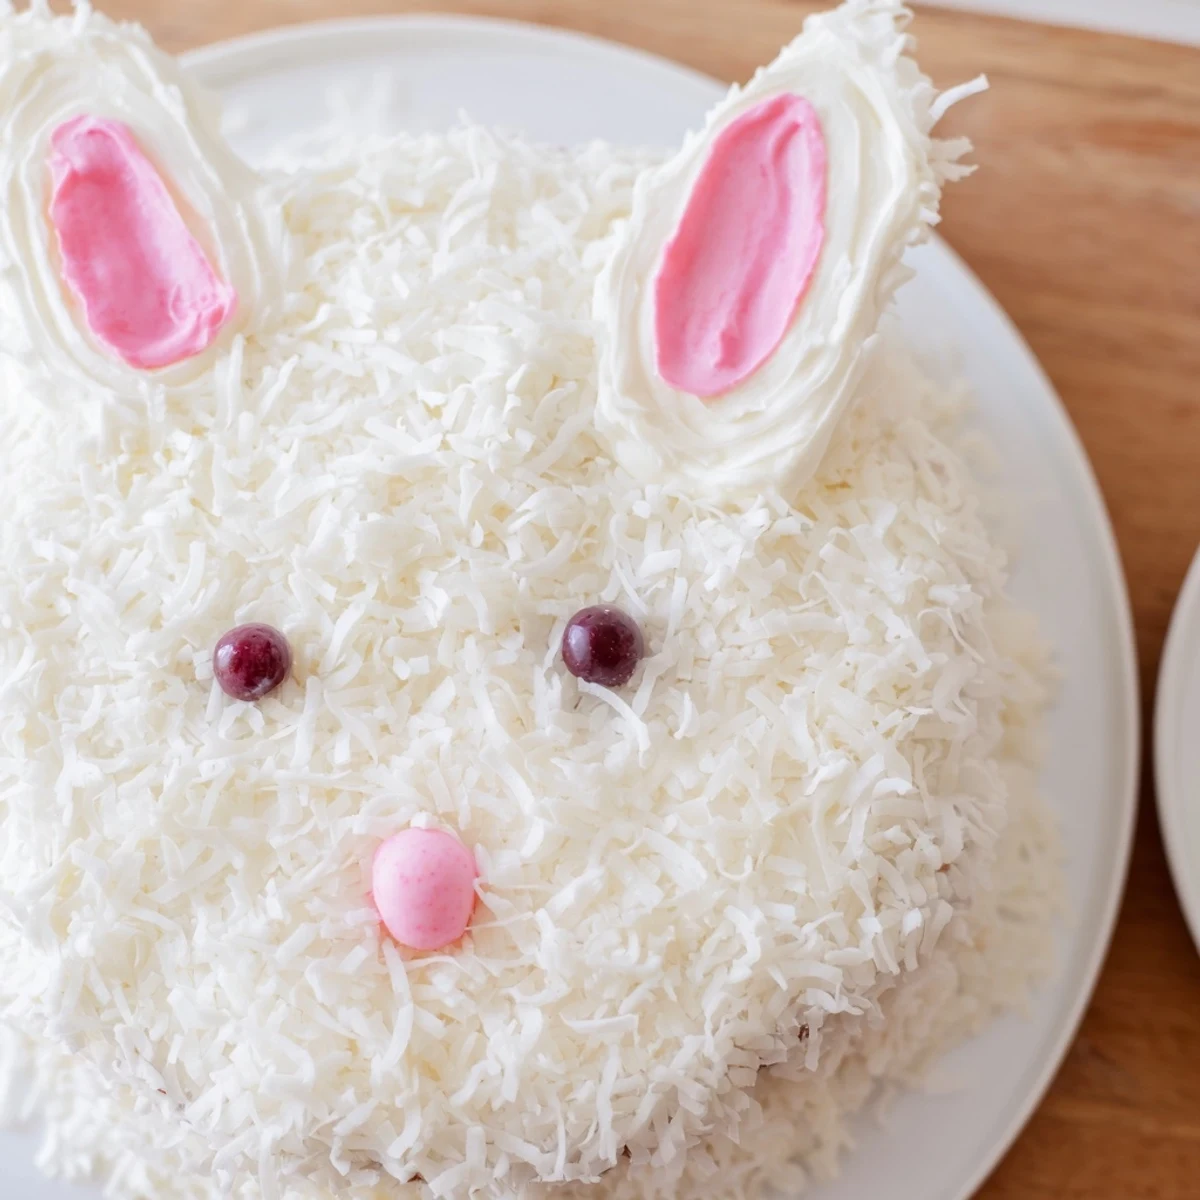
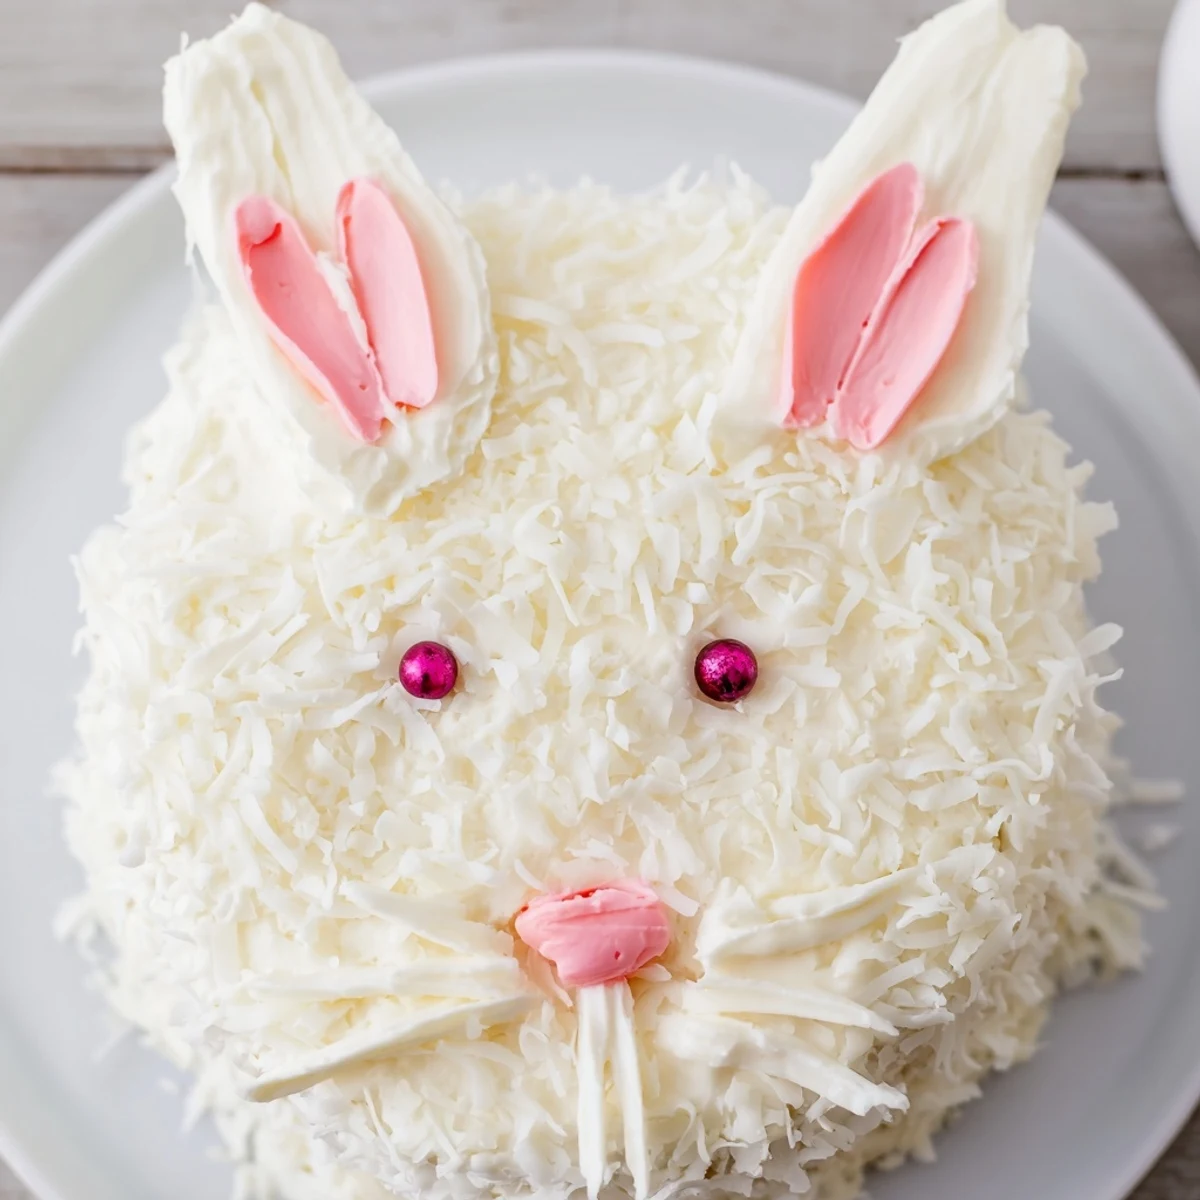
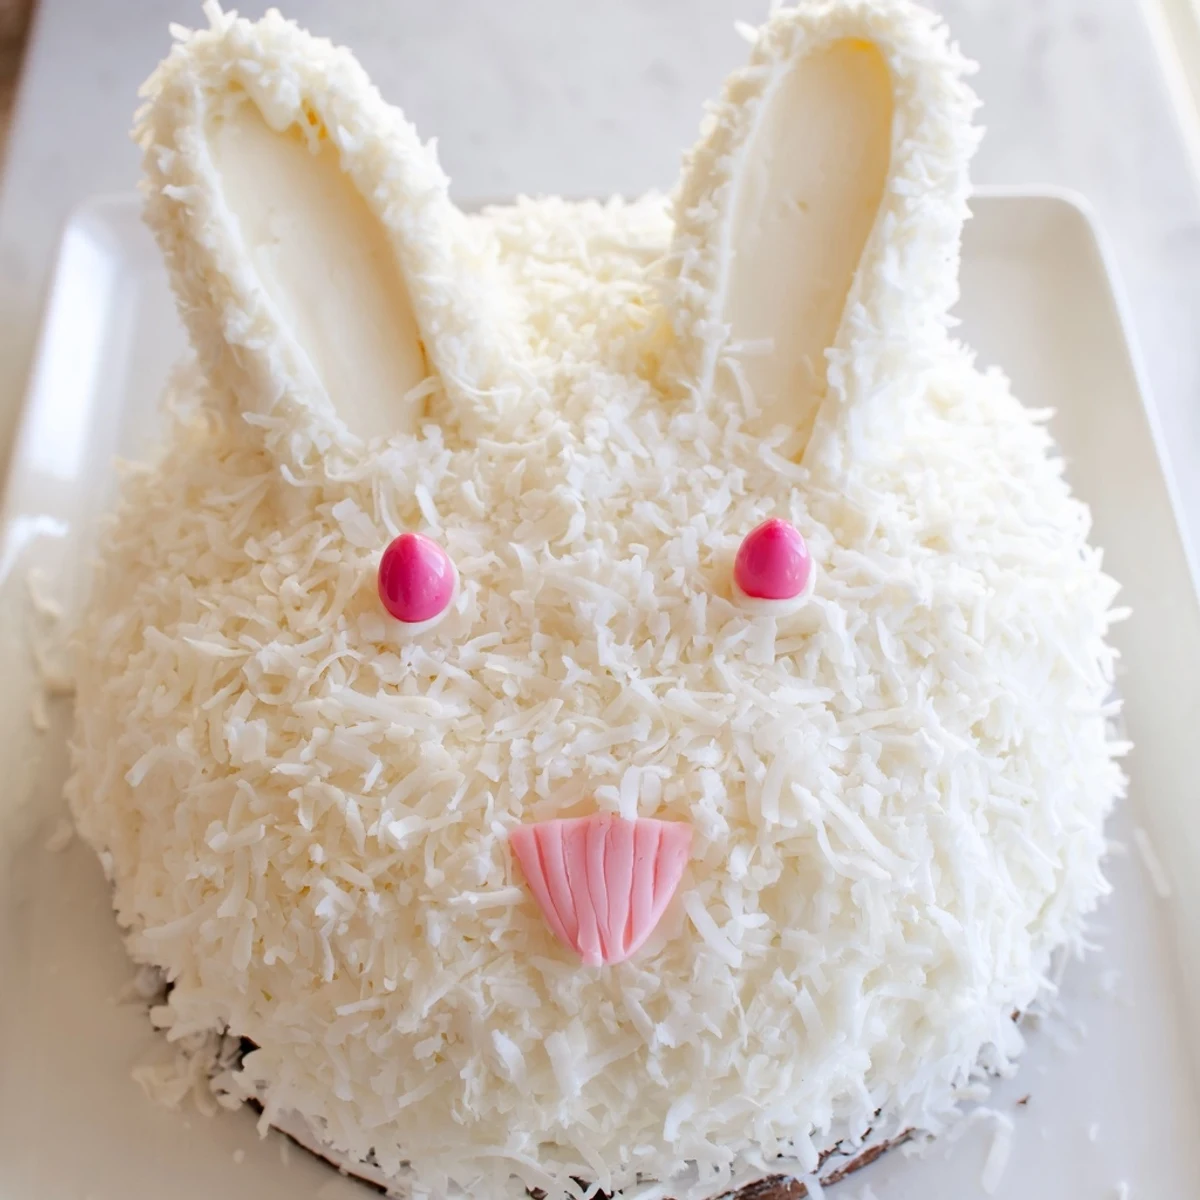
 This delightful bunny-shaped dessert combines tender vanilla layers with silky buttercream frosting and shredded coconut for the perfect furry texture. The whimsical assembly creates an adorable Easter centerpiece that captures spring's playful spirit.
Shaping the cake into a bunny face with floppy ears and a bow tie adds charming character to your celebration table. The coconut coating mimics soft fur while pink-tinted details and candy features bring the bunny to life.
Customize with chocolate cake layers, different frosting colors, or various candy decorations to match your party theme. This crowd-pleasing dessert serves 12 and stays fresh for days, making it ideal for advance preparation.
The Easter I turned seven, my mom stayed up until midnight shaping cake rounds into something magical. I woke up to a fuzzy coconut bunny staring back from the kitchen counter, its pink candy nose slightly melted from the warmth of the room. That bunny cake disappeared faster than any store-bought dessert I've ever seen, leaving nothing but coconut flakes scattered across serving plates like confetti.
Last spring I made three of these cakes back-to-back for different family gatherings. My niece helped decorate the last one, sneaking extra jelly beans into the bunny's smile when she thought I wasn't looking. The photos of everyone leaning over the cake, deciding where to place each candy eye, are some of my favorite moments from that whole season.
Ingredients
- All-purpose flour (2¼ cups): The foundation that gives this cake its tender crumb and structure
- Baking powder and baking soda: These work together to create lift and ensure the cake rises beautifully
- Salt (½ tsp): Enhances all the flavors and prevents the cake from tasting flat
- Granulated sugar (1 cup): Sweetens the cake while creating a moist tender texture
- Unsalted butter (½ cup for cake, 1 cup for frosting): Room temperature butter incorporates perfectly for both cake and buttercream
- Large eggs (3): Bind everything together and add richness to the crumb
- Whole milk (1 cup for cake, 2-3 tbsp for frosting): Creates moisture and helps achieve the perfect frosting consistency
- Vanilla extract (2 tsp for cake, 1 tsp for frosting): Pure vanilla makes both cake and frosting taste homemade and special
- Powdered sugar (4 cups): Sifting first prevents lumps in silky smooth frosting
- Sweetened shredded coconut (2 cups): Creates that irresistible fluffy bunny fur texture
- Pink food coloring: A tiny drop transforms plain coconut into blushing inner ears
- Jelly beans or mini candies: Perfect for creating an expressive bunny face
- Pink and white fondant or marshmallows: Shape these into adorable perky ears
Instructions
- Preheat and prepare your pans:
- Heat your oven to 350°F and generously grease two 8-inch round pans with butter, then dust them with flour, tapping out any excess
- Whisk the dry ingredients together:
- In a medium bowl, combine flour, baking powder, baking soda, and salt until well blended
- Cream the butter and sugar:
- Beat the softened butter and granulated sugar in a large bowl until the mixture turns pale and fluffy, about 3 minutes
- Add eggs and vanilla:
- Beat in the eggs one at a time, letting each fully incorporate before adding the next, then mix in the vanilla
- Combine wet and dry ingredients:
- Alternate adding the flour mixture and milk to the butter mixture, beginning and ending with the flour, mixing just until combined
- Bake the cakes:
- Divide the batter evenly between the prepared pans and bake for 22-25 minutes until a toothpick inserted in the center comes out clean
- Cool completely:
- Let the cakes rest in their pans for 10 minutes before turning them out onto wire racks to cool entirely
- Make the buttercream frosting:
- Beat the softened butter until smooth, then gradually mix in powdered sugar, vanilla, salt, and just enough milk to make it spreadable
- Shape the bunny pieces:
- Keep one cake round whole for the face, cut the second round into two oval shapes for ears, and trim the remaining center piece into a bow tie
- Arrange on your serving tray:
- Position the face in the center with ears above and bow tie below, leaving small gaps between pieces
- Apply a crumb coat:
- Spread a thin layer of frosting over all the cake pieces, then refrigerate for 20 minutes to set
- Coat with coconut:
- Frost the cake completely with remaining buttercream and press shredded coconut gently over the entire surface for that furry look
- Add pink details:
- Tint a small handful of coconut with pink food coloring and carefully press it onto the inner ear sections
- Create the face:
- Place fondant or marshmallow ears on top, then add jelly beans or candies for the nose, eyes, and whiskers
 Pin It
 My aunt still talks about the bunny cake I brought to her Easter brunch three years ago. She had never seen anything like it and insisted on taking photos before anyone could even think about cutting into it. That cake became the conversation starter that brought together family members who hadn't spoken in months.
Making It Your Own
Chocolate cake works beautifully with this design if you want a richer flavor profile. You can also use chocolate frosting and chocolate cookie crumbs for a different bunny entirely. I once made a chocolate version with white coconut that looked like a cute Dutch rabbit.
Decoration Shortcuts
Store-bought frosting can save you precious time during busy holiday preparations. Premade fondant shapes or even large marshmallows cut in half work perfectly for ears. Licorice strings make instant whiskers without any fancy cutting or shaping.
Serving And Storage
This cake serves 12 generously, though portions may disappear faster than expected. Keep it covered at room temperature for up to two days or refrigerated for four. The coconut softens slightly in the refrigerator but still maintains its charming appearance.
- Use a large offset spatula for the smoothest frosting application
- Place the serving tray where you plan to store it before assembling
- Have extra jelly beans handy for inevitable taste testing during decoration
 Pin It
 Every time I make this bunny cake, I remember that childhood Easter morning and how something so simple brought so much joy. Hope your holiday becomes just as memorable.
Recipe Questions & Answers
- → How far ahead can I make this bunny cake?
-
Prepare the cake layers up to two days in advance. Wrap cooled layers tightly in plastic wrap and store at room temperature. The buttercream frosting can be made ahead and refrigerated for up to one week. Complete assembly and decoration on the day of serving for the freshest appearance, though the finished cake stays delicious for 2-4 days when properly stored.
- → What's the best way to tint coconut pink?
-
Place shredded coconut in a ziplock bag and add a single drop of pink food coloring. Seal the bag and massage gently until the color distributes evenly. Add more coloring drop by drop until you achieve the desired shade. Spread the tinted coconut on a paper towel to dry for 15-20 minutes before applying to the cake.
- → Can I use store-bought cake mix and frosting?
-
Absolutely. Use two boxes of white or vanilla cake mix prepared according to package instructions. Store-bought vanilla frosting works well, though you may need three containers to fully cover the assembled bunny shape. The flavor will still be delightful, and you'll save significant preparation time.
- → How do I transport a bunny cake without damaging it?
-
Assemble and decorate the bunny directly on a sturdy, portable serving board or cake cardboard. Carefully place the decorated cake in a large cake box or cover with a cake dome. Support the board from underneath during transport and keep the cake level. Drive carefully and avoid sudden stops to prevent shifting.
- → What alternatives work for the bunny ears?
-
Pink and white fondant cut into ear shapes provides structure and smooth surfaces. Large marshmallows, either halved or cut diagonally, create adorable floppy ears. For a simpler approach, use pink construction paper or cardstock wrapped in wax paper. even large pink candy melts or chocolate disks can serve as ear details.
- → Can I freeze the unfrosted cake layers?
-
Yes. Wrap each cooled cake layer completely in plastic wrap, then again in aluminum foil. Freeze for up to three months. Thaw overnight in the refrigerator before frosting and assembling. Bring to room temperature for 30 minutes before applying buttercream for the smoothest application.
